PLTW

Halloween Mini Project
This is my Halloween Mini Project! The task for this project was to make a Halloween animatronic for the end of the month to show to the school admin and anyone else who was interested in our creation. If you continue to scroll below, you can see the timeline of my creation with the final result.
01 Brainstorming
Like all good creations, we had to start with the brainstorming process and really decide what we wanted to create. Our only criteria were that our project needed to be an animatronic with at least one moving part and it needed to be within our $20 budget. We had a lot of flexibility and in the end, we were inspired by Voldemort from Harry Potter. Particularly when Voldemort tries to kill baby Harry Potter.
Bellow in order from left to right, top to bottom; 3D model of our Voldemort body frame by Kim Hansen (me), animatronic inspiration, Voldemort, baby Harry Potter


03 Dressing Up and Coding
Finally, we had to put all our pieces together and code the motor amongst other VEX parts, such as the red scar on baby Harry Potter's head. To prepare everything for the final assembly, we had Elisa (a team member) paint Voldemort's head, we attached the arms and drew the cloak over Voldemort, and we secured the pvc backbone into the base.
In terms of coding, I was in charge of getting the VEX parts working and moving. I successfully coded Voldemort's arm to move up and down with the wand and laser pointer via motor. Then, I made sure the light in Harry's head lit up when Voldemort's wand was aimed at Harry.
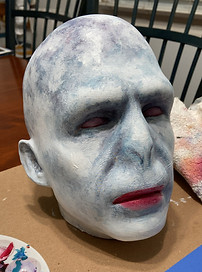
Bellow in order from left to right; 3D printed Voldemort head painted by Elisa Castro, black cloak on Voldemort body pvc pipe frame.

Want more information on this point? See our project update, check it out!
02 Building the Base
Now it was building time. Based on our 3D model, we needed a strong skeleton frame with an even stronger base. In the end, PVC pipes were the strongest and cheapest option because we already had them in our classroom. Then, we used a wooden circle with a hole in the middle and some bricks to secure the main PVC pipe. Once those components were done, I 3D printed a Voldemort head for the body and we used a double-sided screw to attach it to the base. Other pieces we saved were a baby doll, a cardboard right arm, some motors and VEX parts, a black cloak, a green laser pointer, and a Voldemort wand.
Bellow in order from left to right, top to bottom; 3D printed Voldemort head, pvc pipe body frame with cardboard left arm, double-sided screw in the body base.


Want more information on this point? See our project update, check it out!
04 Final Result
In the end, we had a very successful project! All the components worked in the end, meaning Voldemort could cast his wand and baby Harry's scar would react in pain. As you can see in these photos, our bottom base was constructed with giant textbook boxes amongst a few bricks. The cloak on Voldemort's body also did a good job of hiding his coded parts and pieces. Overall, Voldemort has a finished and canceled look that our group was very proud of.


Final Project Presentation Poster
Here's our ending project poster. It covers the process of our creation and building process.
.jpg)